skip to main |
skip to sidebar
I promised a craft project that wasn't a card...and here it is! I had a denim tote bag, some printable fabric (JuneTailor), and my PC Crafter graphics (Laurie Furnell). After that, it didn't take long to figure out what I wanted to do. A shopping tote! This just happens to work into Kerry's challenge over at Three Clovers Designs "New Year's Resolutions card or project that represent your goals for 2010." I don't always remember to take my totes with me into the store (they're in my car) but I think if they were all this pretty, I'd be less likely to forget...I'm really sick of all the plastic bags, too, so this is something I'll get better about this year. Here's a close-up of the graphic I used. Isn't it pretty? It's big, too, nearly taking up the entire 8.5x11 fabric sheet! I dressed it up a bit with some bling on the wings of the bugs & the dots down the sides.
 And I just had to show you what I got for Christmas. My girlfriend/neighbor had her hubby make her some storage for her 8.5x11 cardstock to go in her craft room. He had some birch scrap left over & made both of us cubbies for our markers. He took a router to the openings and all of the edges so nothing to snag or get splinters from. It was so sweet that they thought of me & my COPIC marker addiction. I have 68 Sketch makers & as you can plainly see, I have room to grow!
 Tomorrow is Keepin It Simple Sunday, so I'll see you then. Thanks for stopping by & have a great rest of your day!

Well, friends, it's COLD COLD COLD here today (started snowing about an hour and a half ago) and so my mojo to empty the rest of my boxes from our move just withered up & blew away in the frigid north winds. I ended up redecorating the blog here, loading up my Playlist with Christmas tunes, then playing with some stamps, ribbons, and digital images that I printed off ages ago. Came up with a nice selection of cards for today's K.I.S.S. post. Guess we're overdue, since I haven't done any of these for ya in a couple of weeks. These first two were SUPER SIMPLE. I trimmed them out (these 2 images & 3 borders that you'll see later were already printed & sitting on a full sheet label in a file cabinet), peeled off the backing & stuck 'em down. Doesn't get any easier than that! *LOL* These are two 4.5"x6.5" wheat colored cards by K&Co - they really made the country colors jump out beautifully. On the one above, I used some Distress Stickles in "antique linen" on the corner stars & some burgundy Stickles on the jar lids. I'd provide a link for this set of images, but Theresa Kogut's work is no longer available through PC Crafter...I think I bought them about a month before her contract with them ended, 2 years ago.
 For this one, I used a pre-made A2 base, some soft blue dotted satin ribbon by American Crafts, a pair of deckle-edge scissors, a stamp from Inkadinkado, my Xyron 510, Tsukeniko ink in "sea breeze," & Martha Stewart's clear (fine & coarse) and carrara glitters.
 I ran the stamped image face down through the Xyron to get a nice even coat of "sticky" then sprinkled the glitters on. YUMMY!
 Just look at that thparkle! Feels positively FROSTY!
 This little gingerbread man is another darling stamp from Inkadinkado (gotta LOVE the $1 bin at JoAnn's!). I used "rich cocoa" ink by Tsukeniko, a pre-made Kraft card base, some more of those cool glitters from MS, my Xyron, and some wired country ribbon that I've had forever (like back when I started making my candle jars).
 Doesn't he look delicious?!?
 This is one of those borders that I printed on that full label sheet. I cut it in half & trimmed as close to the image as I could (top n bottom) - I had just enough to do a double border. Then I cut a strip of red paper about 1.5" wide and stamped the sentiment from The Angel Company's "Vintage Santa" in white. I have to apologize, I can't find any links for these sets...I'm wondering if they were part of my monthly HugClub membership...
 Here's the second border from PC Crafter, done the same way as the peppermint. The sentiment from TAC is done in burgundy.
 Here's the final PC Crafter printed border, mounted onto a wheat color pre-made card from K&Co, with the sentiment stamped in Tsukeniko's "lady bug red."
 This last one is the "hardest" of my K.I.S.S. cards today. I used a snowflake from one of the "Purchase with Purchase" sets, called "Swirly Seasons," and stamped it in lady bug red all over a 5x7 pre-made base. I had a bit of spare "Swiss Dots" Cuttlebug-embossed cardstock that I mounted onto some red paper, trimmed it to match with my "ripple" scissors, then stamped this swirly cardinal from Inkadinkado in lady bug red ink, and "sugared" the image with my Xyron & MS glitters.
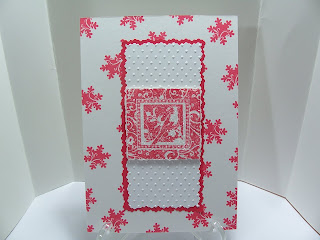
 It was still very simple to do & the result was STUNNING! I'm REALLY happy with how it turned out. I hope these give you some inspiration to whip up some lovely, elegant cards for family and friends....FAST (and SIMPLE, of course!).Thanks for stopping by & have a great rest of your day!!
I know, I know...two posts in one day. No, I'm not trying to make it snow. *LOL* I just really wanted to share those Halloween cards with you earlier (I had so much fun putting them together!). I would have been back on here sooner, but Chris' dad is here with some of his friends from Texas and he spent the afternoon with us. Someone had to drive him back to the house where he's staying & that "someone" turned out to be ME. Not that I mind...I adore Kenneth. You couldn't meet a kinder man. The boys just LOVED seeing their "Pops" again & he was amazed at how TALL they're all getting. We'll be getting together again this week around Wednesday for dinner out - something I NEVER get to do any more thanks to the ole cranky pancreas - so I'm looking forward to it. I love visiting with his friend's wife...she's been in the U.S. for nearly 30 years but to hear her thick German accent, you'd think that she's only been here a few months!Anyway, enough of my rambling. Here's tonight's card. I used a pre-made A2 base of kraft paper, printed a strip out of my clip art collection (Theresa Kogut). As soon as the ink was dry, I cut it out, ran it through my Xyron 1.5" sticker maker, and stuck it onto the card. Done! Simple, & multi-purpose, just how I like 'em. In fact, it took me longer to decide which graphic to print than it did to make the card! *LOL* Hope you like this week's edition of K.I.S.S. I've got a Christmas stamp set from The Angel Company that's calling my name, so maybe I'll have something else to share with you soon. Thanks for stopping by & have a great rest of your day!!
K.I.S.S. = Keep It Simple Sunday. I thought this would be the perfect day of the week to show you a card or two that I've made using 4 steps or less...keeping it simple. We're so used to making & seeing elaborate cards out there in blogland, that I thought this would be a great way to inspire new/beginner card makers or remind the more advanced that it's okay to go back to your roots. *LOL* Here's my first card for you: I took a black/white image from PC Crafter (The Cutting Edge, by Anne Fetzer, retired CD), colored it with my COPIC markers, cut it out, used some Diamond Stickles around the edge & mounted it onto a Cuttlebug embossed pre-made blank. Simple, yet striking, I think. I hope you like this series as much as I'm looking forward to bringing it to you!Thanks for stopping by & have a great rest of your day!!
Good morning! Well, at least it's still morning HERE...sorta. *LOL* I'm sitting here fighting off a massive sinus headache (stoopid cottonwood trees! grrr), sipping on some liquid sunshine, & trying to wake up. I've been up since 0800, but dummy ME didn't call it a night till 0300 this morning. I don't KNOW what I was thinking, okay?!? I started pulling old pix out of files for today's post, working on some new cards, and the next thing I know, the early morning birds are starting to sing. Bet I don't stay up late tonight! *ROFL*Yesterday, I shared a hybrid project with you. This is another one that I made back in February 2008 (I've been collecting digital graphics, elements, & scrap papers since the summer of 2007 so I've got plenty to play with). The pre-colored graphics are from Marie Cole at PC Crafter (if any of you are tole painters, I KNOW you'll recognize this bear), sentiment is mine, and I've added raindrop stickers to finish the hybrid project. Inside, the sentiment is finished with one word...FRIENDS! Now here are some examples of ALL digital...
 Yes, even the LACE & the FLOWER are digital embellishments. They look REAL, don't they? Everything on this card, except the sentiment (mine), is from Manuella Zimmerman. I used my Print Shop program to do all of these. You can even do them in Word if you don't have a graphics program to work with.
 This one (above) is from a freebie set by The Shabby Princess. Loved the blue & pink together with the little hat pin. Simple & elegant and NO LAYERS!
 The only thing NOT digital on this card (above) is the inking that I did around the edges with my Ranger Ink Distress pads. Images are from Raspberry Road Designs.
 The backgrounds & images on these cards (above & below) are from Trina Clark. She's got some of the best prim artwork out there. AND...a lot of her graphic sets come with linework, so if you want to color with your pencils, watercolors, or markers, you can! For these, I just printed them onto some cardstock, trimmed with my deckle scissors, did some highlighting with my Sakura Stardust clear gel glitter pen & mounted them onto pre-made card bases. EASY PEASY!
 Now, these are the cards that kept me up WAYYYY too late last night. The first two are hybrids - the light & dark pink polka dot background papers came from my friend Kristine over at Wench'd Grafix. She's got some wonderful things in her store and the sweetie is always giving away digital goodies for us to play with. Love ya, GF!

 The stamped image is from The Angel Company ("Tickled Pink") - another in my newly collected stash donated from other Angels for me to play with. I have to be honest, I'm NOT a flamingo person, but these are just SO STINKIN CUTE, I couldn't resist! Images are colored with COPIC markers & the backgrounds are chalked with 2 shades of pink, violet, & a medium blue. Had to add some "bling" with the rhinestone flowers & her ankle bracelet is highlighted with my Stardust glitter pen by Sakura (which T~A~C will carry in the NEW catalog coming July 1st!).


 I've got a couple more flamingo images that I'm gonna play with later. I'll share, I promise! And here's my lovely horse from T~A~C. The background paper is from the Rustic Chic pad by T~A~C, a little twine lariat (made by moi), a gold Texas concho antiqued with Brushed Corduroy Distress Ink by Ranger, some tan textured mat paper by DCWV, & colored with COPICS.


 And finally, a Darcie stamped image, from a swap that I did with some friends a month or so back. I cut this one apart, colored it with my COPICS, used Aleene's Paper Glaze on the bubbles for some dimension & shine, & my Sakura white gel pen for some highlighting on her hat. Paper is from ProvoCraft, matting is from DCWV.


 Well, I've got more to share with you, but I think that it can wait till tomorrow - this post is long enough! *LOL* If you haven't signed up for my blog candy & you live in the USA, be sure to do so - you've got till Tuesday night to get in. Thanks for stopping by & have a great rest of your day!!

 ——–


 Here's a close-up of the graphic I used. Isn't it pretty? It's big, too, nearly taking up the entire 8.5x11 fabric sheet! I dressed it up a bit with some bling on the wings of the bugs & the dots down the sides.

 Tomorrow is Keepin It Simple Sunday, so I'll see you then. Thanks for stopping by & have a great rest of your day!


 Posts


 table, tr, td, li, p, div {font-family:Lucida Handwriting; color:000000; font-size:18px;}.btext {font-family:Lucida Handwriting; color:000000; font-size:18px;}.blacktext20 {font-family:Lucida Handwriting; color:000000; font-size:18px;}.blacktext20 {font-family:Lucida Handwriting; color:000000; font-size:18px;}.lightbluetext12 {font-family:Lucida Handwriting; color:000000; font-size:18px;}.orangetext15 {font-family:Lucida Handwriting; color:000000; font-size:18px;}.redtext {font-family:Lucida Handwriting; color:000000; font-size:18px;}.redbtext {font-family:Lucida Handwriting; color:000000; font-size:18px;}.text {font-family:Lucida Handwriting; color:000000; font-size:18px;}.whitetext12 {font-family:Lucida Handwriting; color:000000; font-size:18px;}a:active, a:visited, a:link {font-family:Lucida Handwriting; color:000000; font-size:18px;}a:hover {font-family:Lucida Handwriting; color:000000; font-size:18px;}a.navbar:active, a.navbar:visited, a.navbar:link {font-family:Lucida Handwriting; color:000000; font-size:13px;}a.navbar:hover {font-family:Lucida Handwriting; color:000000; font-size:18px;}a.redlink:active, a.redlink:visited, a.redlink:link {font-family:Lucida Handwriting; color:000000; font-size:18px;}a.redlink:hover {font-family:Lucida Handwriting; color:000000; font-size:18px;}.nametext {font-family:Lucida Handwriting; color:000000; font-size:18px;}
