
 ——–
——–
 I also have a new collection by Inque Boutique (recently bought out by Darice Craft Corporation) called SeeDs that I purchased off of eBay last month. They're rubber stamps, but they're not mounted on wood blocks, which is nice for storage - most of the larger sets come in their own clear plastic storage boxes with labels and the smaller sets can actually fit inside CD jewel boxes. Down side - they have these black foam mats that come with every set you purchase and only the larger boxes have space to accommodate the mats, so 9 times out of 10, you end up with the smaller mats just laying around in boxes. The mats are an integral part to the SeeDs collection - they're designed to go under the paper or cardstock that you're stamping, you put the stamp on an acrylic block & it gives a nice crisp design. They have TONS of detail & are definitely the UP side of rubber stamps.


 Now, my clear stamp collection...those are my big passion lately! It's amazing that they can get almost as much detail in those now that they do in the rubber stamps...AND you can put GOBS of them into a photo storage box (IMPORTANT TIP: don't leave them exposed to light for too long - something in their chemical makeup causes them to harden and yellow over time after prolonged light exposure). I am, however, tired of digging through my box looking for stamps, and the little singles or mini sets are always slopping around in the box.
 I recently ordered 2 leather-look embossed binders designed by Tim Holtz (the design KING & driving force of Ranger Inks) that will hold not only my clear stamps, but unmounted rubber stamps, too. The storage system is the best out of those that I've found (I've been looking at different ones all summer) and the price is reasonable ($22-29 for the binder depending on the retailer). Each binder comes with 3 storage pages to get you started. The pages let you put the stamps on the outside of the page and there's a center insert in each page for you to drop in some cardstock with the stamped images to line the stamps up against (or store rub-ons & stickers if you'd like - my stickers & rub-ons have their own photo storage box so I doubt that option will work for me - that's another post altogther). The inside front of the binder has specially designed pockets for your acrylic blocks, and when the book is unzipped, it lays completely flat on the table, giving you total access to all of your stamps. It's really money well spent, when it comes down to storage investments. The extra pages for the binders come 5 to a pack for $3-5, so the options for expansion of your stamp storage depends on your bookshelf space for holding all of your funky, fun Tim Holtz binders! (LOL) As soon as my binders arrive & I get my stamps in them, I'll show you how they turn out.
For now, I'd like to show you some recent additions to my clear stamp collection, so if you haven't considered these before, maybe now you will. The details are, like I said, just as good as the rubber, without the issue of the wood blocks chewing up space.


 Now here's the basic & biggest problem to having all of these different types of stamps: not all of my inks work on all of my stamps. Naturally, the rubber stamps aren't really an issue, since most inks take to them very well. It's the CLEAR STAMPS that inks don't want to play nice with. I have found that most inks bead up on the clear stamps. I have a LOT of ink already (2 boxes full), but eventually as some of these pads dry up & go away, I'd like to have one basic line of inks that I'll reach for.
 As you can see, I have one box of nothing but Stampin Up! brand inks - until a couple of days ago, all I had were the Classic inks & re-inkers. I'm now collecting the Craft version of their colors & I'll explain WHY toward the end of this posting. The other box holds my Ranger Distress inks, Ranger Adirondak variegated color pad, Color Box brush pigments (the little cat's eye ink pads), VersaMark, StazOn, VersaColor (the little 1" squares), VersaCraft (for fabric stamping), Studio G, & Stampology.
 I love, love, LOVE my Ranger Distress inks & will never get rid of them - they're wonderful for antiquing papers and the brayer works well with them for all-over coverage. The VersaCraft is for paper, wood, & fabric, which is nice, but it's very limited when it comes to color range. The Studio G is a recent purchase - my friend at BenFranklin turned me on to them (thanks Wade!) - they only have out autumn colors right now, but for $1 per pad they're great (and talk about JUICY - lots of ink in them). I picked up the Stampology ink pad last week at WalMart ($2) because it said that it's specifically designed for clear stamps and guaranteed to not bead up or bleed. Well, let me show you my test results:
 Studio G ink with a clear stamp - little to no bleeding
 StazOn gave the crispest "black" image - no beading on the clear stamp.
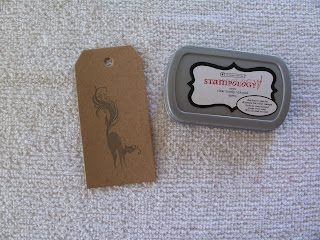 Stampology ink - they're right. It does NOT bead up or bleed with the clear stamps, BUT this is onyx (the only color it comes in, as far as I know) & as you can see it's not a very dark ink. That's the part I don't like...if I'm using black, I want it to be BLACK.
 Ranger Adirondack ink - beads slightly & does bleed, but it's GREAT for using with brayers for an ombre color across papers.
 Color Box brush pigment (black) - no beading up on the clear stamps, but not good color saturation, either.
 Ranger Distress inks & other Studio G inks - beading up on the clear stamps.

 Stampin Up! Craft inks - no beading, the best color saturation. Down side - takes FOREVER to dry!
 Another Color box brush pigment test - can't tell the difference between silver & black till you get them in the sunlight.
So after all of this, when it comes to working with my clear stamps, I think I'll end up with a nice collection of the Stampin Up! Craft ink "color spots" - little 1" pads of ink, 12 to each collection for about $26. I'll just have to keep a hair dryer on hand to speed up the drying time. I've already been playing with some of them & will show you how they finish up in tomorrow's post. I've typed enough for one day...now I'm gonna go play!
Thanks for looking & have a great rest of your weekend!


 table, tr, td, li, p, div {font-family:Lucida Handwriting; color:000000; font-size:18px;}.btext {font-family:Lucida Handwriting; color:000000; font-size:18px;}.blacktext20 {font-family:Lucida Handwriting; color:000000; font-size:18px;}.blacktext20 {font-family:Lucida Handwriting; color:000000; font-size:18px;}.lightbluetext12 {font-family:Lucida Handwriting; color:000000; font-size:18px;}.orangetext15 {font-family:Lucida Handwriting; color:000000; font-size:18px;}.redtext {font-family:Lucida Handwriting; color:000000; font-size:18px;}.redbtext {font-family:Lucida Handwriting; color:000000; font-size:18px;}.text {font-family:Lucida Handwriting; color:000000; font-size:18px;}.whitetext12 {font-family:Lucida Handwriting; color:000000; font-size:18px;}a:active, a:visited, a:link {font-family:Lucida Handwriting; color:000000; font-size:18px;}a:hover {font-family:Lucida Handwriting; color:000000; font-size:18px;}a.navbar:active, a.navbar:visited, a.navbar:link {font-family:Lucida Handwriting; color:000000; font-size:13px;}a.navbar:hover {font-family:Lucida Handwriting; color:000000; font-size:18px;}a.redlink:active, a.redlink:visited, a.redlink:link {font-family:Lucida Handwriting; color:000000; font-size:18px;}a.redlink:hover {font-family:Lucida Handwriting; color:000000; font-size:18px;}.nametext {font-family:Lucida Handwriting; color:000000; font-size:18px;}
No comments:
Post a Comment