 ——–
——–
See you tomorrow!


 Happy Memorial Day!
 Fonts used: Stern & Stimson condensed. I cut out the square with Fiskars edge scissors (ripple) & inked the edges with VersaMagic Aloe Vera. The paper it's mounted on is from My Mind's Eye "Laundry Line" paper pack.
 Image is "frog prince" by Diane Duda & was purchased from FunkyKitsUK. I colored it with COPIC markers (colors listed at the end of this post) & cut it out with my largest Labels 4 Nestie then inked the edges with VersaMagic Aloe Vera & Pixie Dust. Green background paper is from Prima & covers the entire half-fold card.
 Inside of the card. Font used is "Stern." Here's what the card looks like all together. The ribbon is some of my vintage seam binding, colored with mix #1. This is going out in today's mail, headed for Oklahoma...hopefully, it will bring Jayme a smile.
 You can read about Jayme on Lisa's blog HERE. Thanks for stopping by & have a great rest of your day!!
 Doesn't that look DELICIOUS?!? Don't they make your mind just WHIRL with the possibilities of fun projects you can whip up...or is it just dorky ole me? I know that my fate is going to be up to a random generator, but oh, to win this would be such FUN! Click the pic to go enter for your chance to win if your vintage girly-girl is squealing now, too. {winner's name will be announced Monday}
 No? Well, I'm pretty sure that most of you don't know that before I made cards or altered composition books, I enjoyed tole painting. I really got into painting on fabric when my kids were younger - I don't think they ever left the house when they weren't wearing a t-shirt or sweatshirt that had Batman & Robin, Bugs Bunny, The Green Lantern, or something I'd taken from a coloring book! This project was more grown up...
 It's a vest! I bought a bunch of these from a Utah craft store (Zim's) that went out of business a while back. In typical hoarder, um, I mean CRAFTER fashion, I always figured that I'd end up using them for something, just not sure what. Well, over time, I've fused different holiday appliques to them, done some pen and ink drawings, and now I can add tole painting to that list. These darling buggies are from Annie Lang ~ her little critters are always so whimsical! I have quite a few of her tole painting books, but luckily for y'all she's online now & you can download her books and packets...gotta love that instant gratification feature! *LOL*
 Don't they just make you smile?
 I just LOVE these lil ladybugs!
 It's relatively easy to do, especially if you have loads of acrylic paints & Delta's Fabric Medium to mix in, or in this instance, some DecoArt So Soft Fabric Paints. I've done both methods and they wash/wear beautifully and last for a good long time without fading.
 Thanks for stopping by & have a great rest of your day!!
 I used papers from My Mind's Eye; the dress pattern from Little Birdie Secrets & my sunflower decorative edge scissors (the sleeves and the bottom scallops); my yummy new ribbon colored with my homemade glimmer spray in Mix #3; distressed the edges of the photo & inked them with Ranger Distress in Vintage Photo; some homemade pearl glimmer spray on the butterfly; COPICs to color the digital stamp (E04, E50, & BG10); two crocheted flowers from friends; half pearls; Ranger's Liquid Pearls around the neckline.
  For the ribbon, I just did a double row of 1/4" tacky tape, slightly layered over each other (NOT butted), then scrunched the ribbon as I laid it down. I made sure to leave some on the ends to wrap underneath - it's not bulky at all!
 I love my little crocheted flowers...I need to use them more instead of just admiring & putting them back into the jar! *LOL* When I finished with the project, I wasn't really thinking about Ingrid Bergman, although that famous line from 'Casablanca' was stuck in my noggin. I actually pictured...
 {bowing} Your Majesty....
 Whaddya think? These two papers & some more of my pretty ribbons for the next KISS? These are DCWV papers & two 1-yd pieces of ribbon that I dyed the other day, using mixes #1 & #5. Mandy was right in her video on how to make this vintage ribbon....it just wrinkles so beautifully and looks perfectly aged. I just got some COPIC various ink refills in the mail today...think I may dye up some more ribbon this weekend...
 This is a sneak peek of tomorrow's post...any ideas on what it might be? Thanks for stopping by & have a great rest of your day!!
 For this first one, I used the next to largest square Nestie & cut out a deep coral from DCWV's Spring Mat Stack, then inked the edges with cream & jumbo java chalk inks. I also had a square paper doily that was 8x8...I quartered it, cut the center ground out & misted it with Mix 5 from yesterday's glimmer mist project. I also misted the round tag from MS with the same spray. Now I can stamp on the medallion when I know what I'll use the card for, or just leave it blank.
 This one uses a heart doily from the same pack as the square one (I think I got them in the decoupage section of Michael's). I used wheat & pink chalk inks to tone down the bright white & some of the satin ribbon from my first dying experiment.
 On Thursday, I went to Michaels for their "Friends and Family Event" and picked up a couple more packs of mini misters and a pack of Ranger Alcohol Inks (Farmer's Market) to make some more of my homemade glimmer mist sprays. These are the ones I made last month, using Tim Holtz's YouTube video:
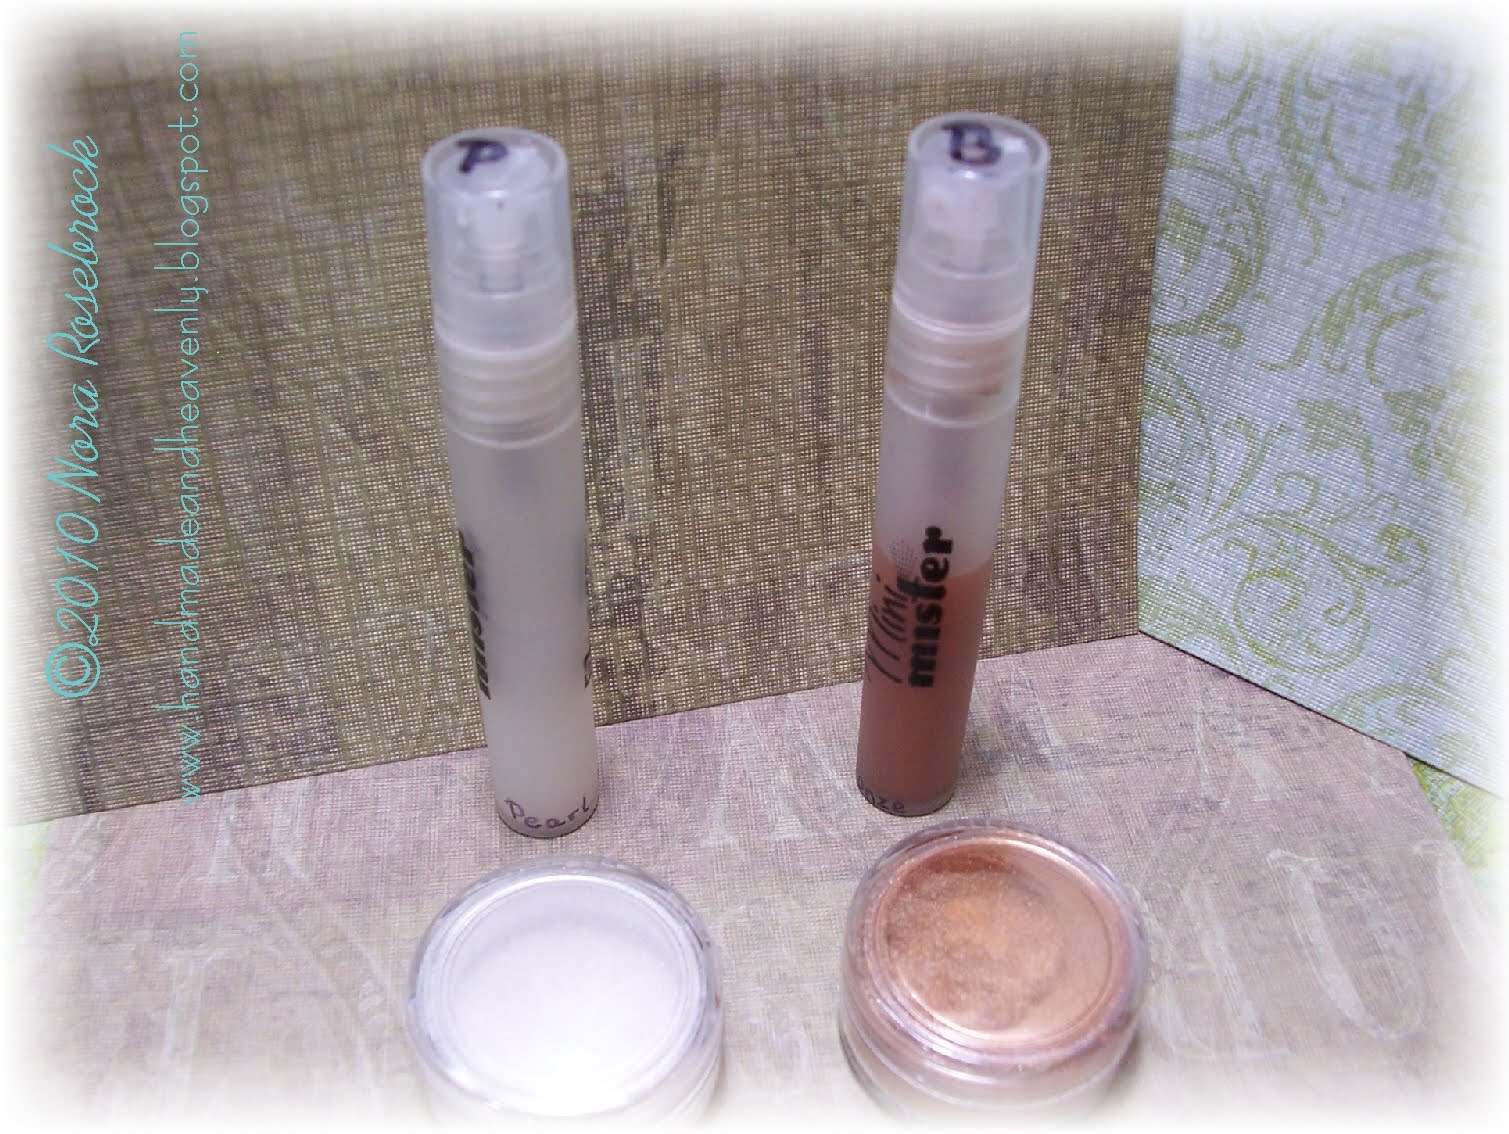 Pearl and Bronze
 Gold and copper. These are the colors (below) that I made from the Ranger Inks and two Stampin Up! colors this morning.
 I numbered the bottle tops as Cordell asked me, "How are you going to keep track of what you're doing with those, Mom?" Good question! I've also got a pretty good solution...
 Remember that little hardcover book that I altered a while back...the one with the blank pages inside?
 Well, I figured I'd write down my recipes in there! {NOTE: I changed the "4 drops of color" to 8-10...when I did my first tests, the colors were pretty thin.}
 I'll share under each "mix" the color combination that I've used, in case you'd like to recreate it.
 Mix 1 - 8 drops of Ranger (Lettuce), 1 small scoop Perfect Pearl (Pearl), & 1 small scoop Perfect Pearl (Gold)
 Mix 2 - 8 drops of Ranger (Eggplant), 1 small scoop Perfect Pearls (Pearl)
 Mix 3 - 8 drops of Ranger (Currant or Cranberry), 1 small scoop Perfect Pearl (Pearl), & 1 small scoop Perfect Pearl (Bronze)
 Mix 4 - 10 drops of Stampin Up (Soft Sky), 1 1/2 scoops Perfect Pearl (Pearl)
 Mix 5 - 10 drops of Stampin Up (Groovy Guava), 1/2 scoop Perfect Pearl (Gold), & 1/2 scoop Perfect Pearl (Copper)


 You can easily alter these mixes to suit your tastes (more or less color, more powder). I like my color sprays to be subtle and soft, almost translucent, and I really think that these will fit the bill.
 Aidan brought home some seeds that they started in class. We'll get some potting soil and transfer them from the glove into the peat pots tomorrow & give them another week or two before putting them in patio planters. We'll have tomatoes, peppers, carrots, radishes, and maybe a cucumber or two.
 On Thursday morning, I had a reply from Mandy of Little Birdie Secrets...turns out the rayon ribbon she uses in that vintage tutorial is called "HUG SNUG" and you can order it from ZipperStop (see the Shopping Section in my right sidebar for the link). I ordered it as soon as I read her reply and it arrived TODAY - I don't know about y'all, but I absolutely LOVE that kind of customer service!
 And it FEELS...OMGosh, it feels absolutely fantastic! This spool was 100 yards, so I'm splitting it with a friend of mine...50 yards is plenty for me to play with for now & I can order more from them later. This eggshell color is just gorgeous (they had OODLES of colors to choose from if you don't want to color your own & the prices are GREAT!). I can already tell that I'm going to have so much FUN making up some vintage ribbon for my cards & other projects.
 Now to get 50 yards of ribbon wound around some of my antique clothes pins...


 table, tr, td, li, p, div {font-family:Lucida Handwriting; color:000000; font-size:18px;}.btext {font-family:Lucida Handwriting; color:000000; font-size:18px;}.blacktext20 {font-family:Lucida Handwriting; color:000000; font-size:18px;}.blacktext20 {font-family:Lucida Handwriting; color:000000; font-size:18px;}.lightbluetext12 {font-family:Lucida Handwriting; color:000000; font-size:18px;}.orangetext15 {font-family:Lucida Handwriting; color:000000; font-size:18px;}.redtext {font-family:Lucida Handwriting; color:000000; font-size:18px;}.redbtext {font-family:Lucida Handwriting; color:000000; font-size:18px;}.text {font-family:Lucida Handwriting; color:000000; font-size:18px;}.whitetext12 {font-family:Lucida Handwriting; color:000000; font-size:18px;}a:active, a:visited, a:link {font-family:Lucida Handwriting; color:000000; font-size:18px;}a:hover {font-family:Lucida Handwriting; color:000000; font-size:18px;}a.navbar:active, a.navbar:visited, a.navbar:link {font-family:Lucida Handwriting; color:000000; font-size:13px;}a.navbar:hover {font-family:Lucida Handwriting; color:000000; font-size:18px;}a.redlink:active, a.redlink:visited, a.redlink:link {font-family:Lucida Handwriting; color:000000; font-size:18px;}a.redlink:hover {font-family:Lucida Handwriting; color:000000; font-size:18px;}.nametext {font-family:Lucida Handwriting; color:000000; font-size:18px;}